Build an Animated Soccer Rating Hexagon in Flutter

With 11+ years of experience in IT industry, I have got my hands into many tech stacks - mobile app development, data analytics, backend using Java/Kotlin.
I expertise on Android(Kotlin) and Flutter(Dart).
I also run a educational YouTube channel with name TECHIE BLOSSOM.
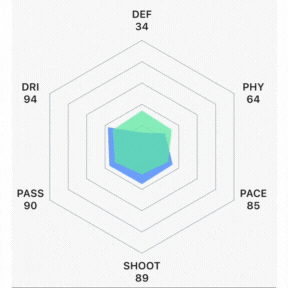
Have you played FIFA? If yes, have you seen a Hexagon-shaped stats comparison?
I was a big addict of FIFA. Now, I am addicted to animations with Flutter. But, my addiction to doing stuff around Soccer hasn’t changed. A few years back, I didn’t have enough knowledge to create a hexagon.
But, now I am aware of that and want to share that knowledge with you. So, let’s begin.
By the time you reach the end of this article, you’d have learned how maths is utilized to draw a hexagon and animate it in Flutter.
I will explain key details here otherwise, the article would soon become Encyclopedia. But, you can refer to the video tutorial on my channel Techie Blossom.
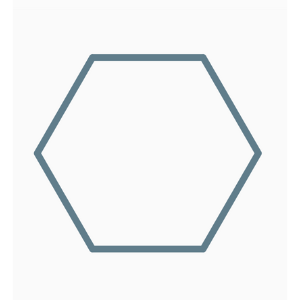
Creating a Hexagon
You can see a hexagon at the back. How to create such a shape in Flutter? Or, do you remember how you created this using geometric tools?
If a regular Hexagon (all sides are equal) is inscribed in a circle, the six vertices of the Hexagon are 60 degrees apart.
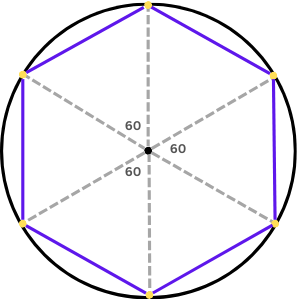
The dotted lines show the distance of the vertex from the radius. All 6 vertices in yellow color are equally distant from the radius. Joining these dots will form the hexagon (blue lines), no matter what.
So, a side of the hexagon can be formed by 2 such vertices. How do we find these offsets?
The formula for Offset on a Circle
A bit more geometry. Let’s derive a formula to plot one vertex.
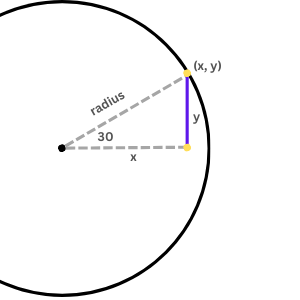
Using trigonometry formulae, you can find x and y. In the above right-angled triangle, the x coordinate is the adjacent side and the radius is the hypotenuse. So, using cosθ we can find x.
$$x = cosθ * radius$$
$$ y = sinθ * radius$$
Let’s code
Now we have sufficient knowledge to draw Hexagon in Flutter.
Have a CustomPaint widget with HexagonPainter.
In the paint(), after determining center we can generate 6 offsets — each 60 degrees apart.
In the above code, there are two offsets created that will form a line. The first offset is at 60 degrees and the other point is at 60 + 60 degrees. You need to repeat it 6 times with a change in degrees so that you have 6 lines.
You’ll also notice center.dx and center.dy so that no matter where your Hexagon widget is, the points generated will be w.r.t the center and not the top-left corner of screen.
In the Flutter coordinate system, the 0° so the first point is in the middle right. Further points are plotted in a clockwise direction. But, there is a catch. The Hexagon that I showed at the start of the article has a different hexagon. It has a vertex at the top center. But, we have a line. So, we need to start our degrees from 30°.
With this small change, our new angles will be 90°, 150°, 210°, 270°, 330°, and 390°. Don’t worry about 390° — it would be normalized to 30° after a full circle.

Multiple Hexagons
The rating hexagon cannot be just a single Hexagon, we have 5 more hexagons — inner hexagons equally distant from each other. With a very small tweak, we can draw inner hexagons.
We can play with the distance of the points from the radius. Take a fraction of 1/5 of the radius so that the new offset is at 1/5th of the radius distance from the center. Similarly, this number will increase to 2/5, 3/5, 4/5, and 5/5 for further inner hexagons.
Filled Hexagon
Until now, you’ve seen hexagons that are made with lines which cannot be filled with a color. But, the ratings' hexagon has two filled hexagons for two players. For filled we will be using ClipPath and CustomClipper.
Here as well we will use radius. In the getClip() we can add a polygon to the path and later return this path from the function.
As a child of ClipPath, I have used a SizedBox with a color. Initially, this will be a square but then it will be clipped.
Finding offsets to create hexagons is the same as we used for CustomPainter. But, the distance has to be custom. It cannot be always a radius. The distance from center will be rating/100 of the radius.
For example, consider a rating of 90. Then we will consider 90/100 of the radius.
When there is a comparison between two players, you need to repeat this for that player as well.
Animation
Now, we can animate the filled hexagon from 0 value to the desired value that depends on the rating of the player. So, using AnimationController and AnimatedBuilder we can achieve the results that you saw at the beginning of this article.
For one player, we’ve 6 ratings — Pace, Shooting, Passing, Dribbling, Physicality, and Defending. So, for one player create 6 tweens of double type.
When the animation controller starts, the beginning value of 0 changes to the exact rating of the player. This value for each rating per frame is being used by AnimatedBuilder and passed to HexagonClipper. The clipper then reclips the widget with the latest value. Hence, you see the animation.
Congratulations 🎉 for completing the article. As I said at the start, this article lists down major steps you need to do to achieve such animations. If you find it difficult to understand, feel free to comment here or watch the video.
If you liked this article, then you know what you’ve to do. Share it with your colleagues and friends and like this article.
You can connect with me on Twitter and learn from my YouTube channel.
I often share my code on GitHub.


